Arduino and the Sharp IR Proximity Sensor
In my last post I demonstrated how I modified a couple of Sharp IR sensors for use with the ServoBot Shield. It recently dawned on me however, that some of you might not know what these sensors are for, and how they are used. With that in mind I decided to put together this quick post as a bit of an introduction.
Introducing the Sharp IR Sensor
The Sharp IR family of proximity sensors are probably the most commonly used sensors by robot hobbyists. This is because they are inexpensive and are ideally suited to small robots.
Most prominently; they are dead easy to use. Whilst these sensors don’t provide the greatest of accuracy, and are also sometimes quite noisy; they do provide enough good information for a robot to determine if it is close to an object, or far enough away to make a choice about what to do next.
Utilising the Sharp IR Sensor
Ok, now we have got the obligatory introduction out of they way lets move onto wiring one up to an Arduino, and the code needed to determine distance. Before we do this however, those of you who want more detail about the operation of these sensors check out this great post by acroname.com.
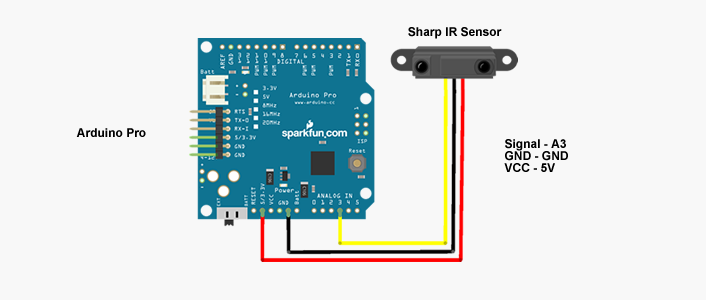
Figure 1: Basic Sharp IR Circuit
As you can see in figure 1, the connection of a Sharp IR to the Arduino is dead simple. All you need to do is attach the sensor to the Arduino’s power and ground lines and one of the anolog pins. The code for the sensor is also as easy to implement. Lets start with a basic look at getting data from the sensor:
<pre class="brush: plain; collapse: true; light: false; title: ; toolbar: true; notranslate" title="">

/*
A simple script to demonstrate the getting of
raw data from a Sharp IR Sensor.
*/

// Define the analog pin used to connect the
// sharp sensor

int sensorpin = 3;

// A variable to store the values from sensor.
// This is initially zero.

int val = 0;

void setup()
{
// Initialise the serial stream
Serial.begin(9600);
}

void loop()
{
// read the value of the sharp sensor on A3

val = analogRead(sensorpin);

// prints the value of the sensor to serial

Serial.println(val);

// wait a little to make reading easier

delay(100);
}
Code 1: Simple data collection from Sharp IR
The code above (1) demonstrates how to get basic data from the sensor. This is great, but both not very user friendly and or accurate. However, by using another article by acroname.com as a guide we can adapt this code so that the outputted data is more linear and also in centimeters.
Take a look at the following:
<pre class="brush: plain; collapse: true; light: false; title: ; toolbar: true; notranslate" title="">

/*
A simple script to demonstrate the getting of
raw data from a Sharp IR Sensor.
*/

// Define the analog pin used to connect the
// sharp sensor

int sensorpin = 3;

// A variable to store the values from sensor.
// This is initially zero.

int val;

// A variable to store the calculated cm value

int cm;

// the setup routine runs once when you press
// reset:

void setup()
{
// Set the pinmode to output
pinMode(sensorpin,OUTPUT);

// Initialise the serial stream
Serial.begin(9600);
}

void loop()
{
// read the value of the sharp sensor on A3

val = analogRead(sensorpin);

// Apply Linearisation

cm=(6762/(val-9))-4;

// prints the value of the sensor to serial

Serial.print("cm: ");
Serial.print(cm);
Serial.println();

// wait a little to make reading easier

delay(100);
}
Code 2: The Improved Code with Linearisation & cm conversion
As you can see the code (2) is pretty much the same, however this time around has an additional line added to the loop that performs Linerisation of the data. In order to facilitate this I have also added an additional int variable called “cm” and separated out the serial output using print. This is simply so I can create a string.
That’s all there is to it. With this code you should now have a working Sharp IR that outputs data to the serial in cm. Once again, I highly recommend that you read the acroname.com articles for more information on Sharp IR sensors.
NB: This code has been designed to run on a 5V Arduino, don’t be fooled by the featured image!