Controlling virtual experiences using biometrics
Over the last year or so I have developed several plugins that allow use of the Microsoft Band, within Android based Unity3D applications. Finally, the time has come to release at least one of them (the most functional if not simple) to the masses.
In this post I will predominately focus on the Unity side of things so that you can get up and running with the plugin asap; however never fear; I will focus on the Java side of things in a future post.
About the plugin
The plugin is structured so that it can and will run in conjunction with other Android Unity plugins. This means that a developer can also leverage other features offered by the Android platform, including: speech recognition, gps, step counting and generic phone sensors such as accelerometers and gyroscopes etc.
Most importantly however; well for me anyway 🙂 is that the plugin can also run on the Samsung Gear VR. By way of result; the MSBand can be used to provide biometric data and multi-modal input that can not only shape and control a players virtual experiences; but also used to evaluate them too…
The use of biometrics in this manner has been a personal research interest of mine for well over a year now.
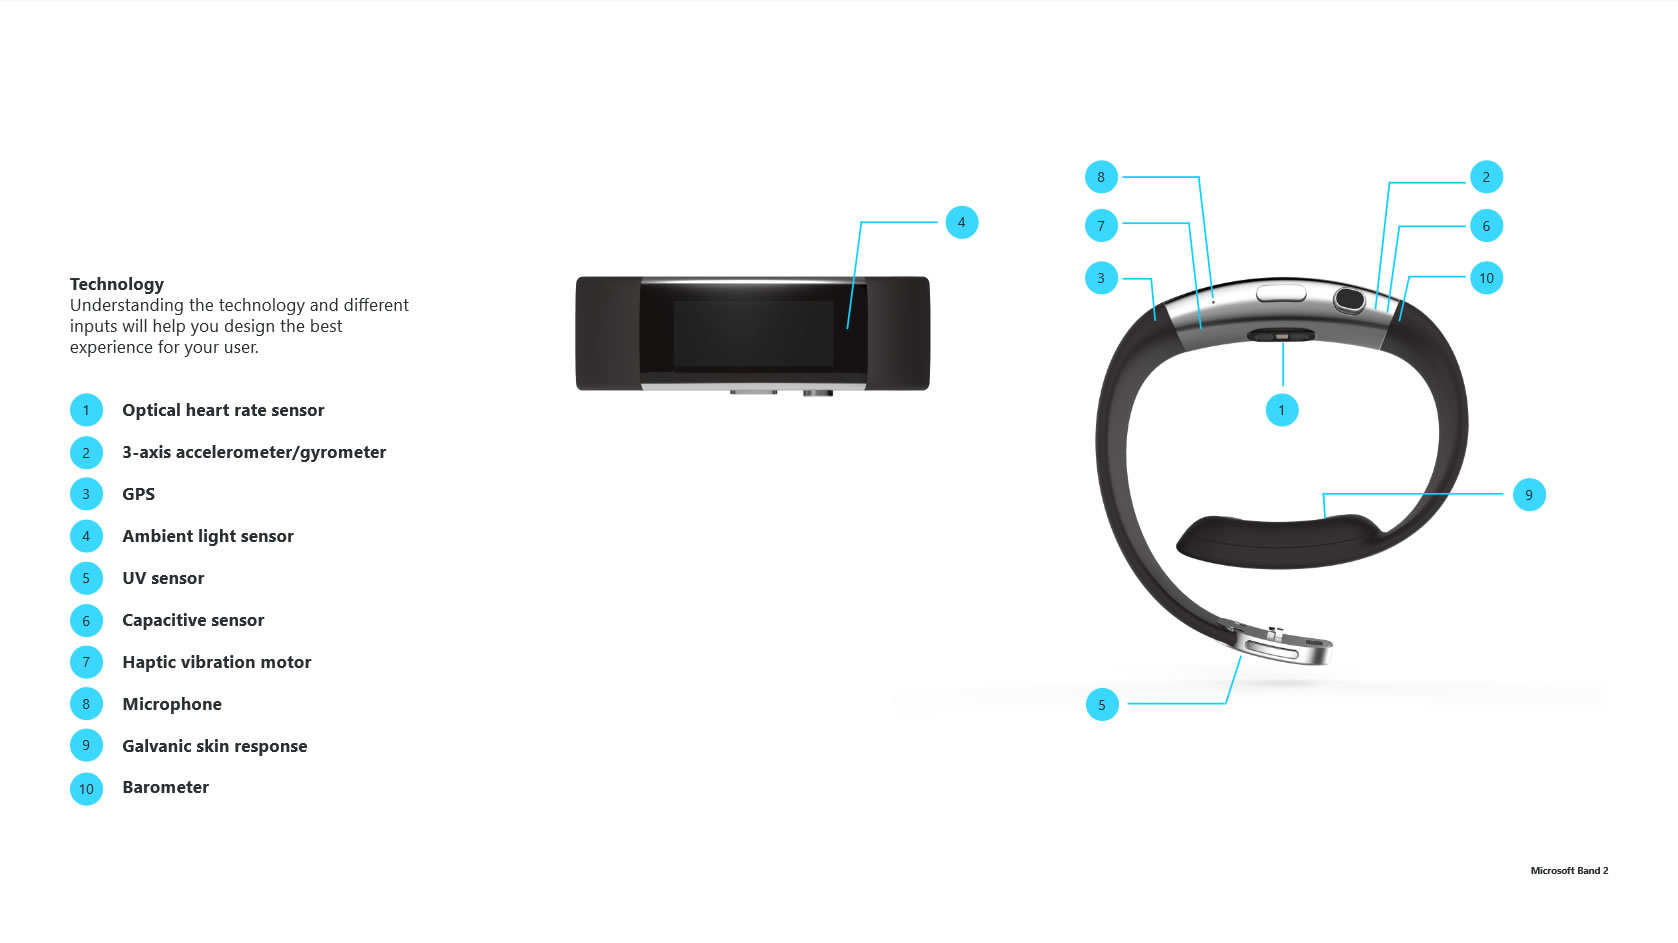
Figure 1: The Band 2 Sensors
During this period I have found that sensors such as those made available via the Band and (Figure 1) Band 2; show great potential for both applied health and well-being based research, and also targeted games based applications.
Plugin Features
The Key features for this initial release include:
- Multiple bands – yes at the same time; this can be quite useful in a VR application
- Support for all the sensors made available via the current (Feb) Microsoft Band SDK
- Support for both the Band 1 and Band 2 (even at the same time)
- Gear VR integration (there is a bit of work to get heart rate to function but it works)
Features that didn’t make it into this release are:
- Static access to properties: this is because I opted for the multi band support. However I aim to make it possible in a future release and just need some advice from a Unity plugin or Android guru.
- Support for tiles: I have got this working as you will have seen in this post, however I am currently making the process simpler for bespoke implementation. Hopefully this will make it into the next release.
Using the plugin
In order to use the plugin you will need to put a copy of both it and the official Microsoft SDK jar (Currently the Feb 2016 release) within the Plugins > Android folder of your Android Unity project. You will also need to include a copy of the three scripts MsBand.cs, Sensors.cs and MsBandAndroidBridge.cs as located within the MsBandScripts folder and as demonstrated in each of the provided examples.
Simply create a GameObject called MsBandManager and add the MsBandAndroidBridge script as a component. You can the communicate with the band via use of method calls and event registration.
Please note that this script affords communication with the plugin via the UnitySendMessage method. For now I have hard-coded the name of the object to which messages are sent and so the GameObject must be called MsBandManager in order to work. I might update the code for the next release so that the naming is set dynamically as with my UnityEV3 plugin but for now you will have to make do 🙂
Registering for Events and Direct Polling
The unity code allows you to use events in order to register for and retrieve data from the plugin. Each time a message is sent from the plugin to the MsBandAndroidBridge class it is parsed via the receiving function and an event fired. At the same time a corresponding instance of the MsBand class is also updated which enables for direct polling.
Each sensor has its own update event and can find all of the events within the MsBandAndroidBridge class.
A Simple Example
The following code example is for the Accelerometer Sensor. First in your scripts start function we will need to both register for Accelerometer events and initialise the connection to any paired bands. If you wanted; initialisation could be moved to a separate method to allow for scenarios such as an activation on button press etc.
void Start()
{
    // Register for raw Accelerometer events.

    MsBandAndroidBridge.RawAccUpdateEvent +=
        MsBandAndroidBridge_RawAccUpdateEvent;

    // Initialise the connection to all bands
    // paired with the mobile device.

    MsBandAndroidBridge.Instance.ConnectToPairedBands();
}
Code 1: The Start Method
Depending upon your IDE; when you create the event registration, a corresponding method will also automatically be created that will be called when the event is fired. In this instance the corresponding method MsBandAndroidBridge_RawAccUpdateEvent looks like the following code block. If your IDE does not do this then you can just add the method yourself. Just ensure that the names match etc.
private void MsBandAndroidBridge_RawAccUpdateEvent(float x, float y, float z, MsBand band)
{
   // Do something with data
}
Code 2: The Event Method
As you can see the raw Accelerometer data is passed to the method as three float values. In addition, an instance of the updated band class is also received. This is useful as it provides immediate access to the whole of the current band state.
private void MsBandAndroidBridge_RawAccUpdateEvent(float x, float y, float z, MsBand band)
{
    if (band.BandId == 0)
    {
        // Do something for band 0
    }

    if (band.BandId == 1)
    {
        // Do something for band 1
    }
}
Code 3: Multiple Band Filtering
More useful however is that it can also be used to identify the band in multiple band applications (code 3).
Getting Heart Rate to work on the Gear VR
Currently (I’m working on it now) in order to get heart rate to function on the Gear VR you will need to deploy a a non VR version of your application to the phone first so that you can grant it permission to access the heart rate sensor data.
To do this all you need do is use a standard (non VR) manifest. Once deployed and running you then need to make a connection to a band and then enable the sensor. This will trigger the required intent request. Once permission is granted you can then replace your manifest with one required for a VR application and deploy as normal.
Don’t forget the Manifest
Please make sure that in both (all) instances that you include the required permissions in your manifest as detailed below:
<uses-permission android:name="android.permission.BLUETOOTH" />
<uses-permission android:name="com.microsoft.band.service.access.BIND_BAND_SERVICE" />
Code 4: Android Permissions
In addition to the plugin .jar and Unity3D examples. I have also placed the full source on GitHub. As stated at the beginning of this post I will be publising another post on the Java side of things soon. In the mean time, please fork away and get in touch with any suggested amendments and or fixes etc.
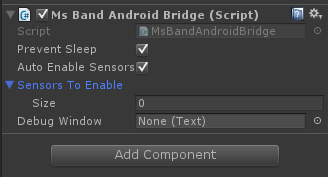
Editor Options
There are also a few options made available via the MsBandAndroidBridge script component that can be set via the inspector (fig 2). Foremost is the ability to auto enable sensors. If set to true this will automatically make the relevant calls to enable the bands sensors during connection and initialisation. This can also be done manually via the Enable & Disable Sensors collection of methods.
Secondly you can select which sensors your application uses via adding their string name to the SensorsToEnable list. If left blank this will default to all sensors. Finally the PreventSleep property can be used to prevent your application from sleeping via the Unity SleepTimeout.NeverSleep command.
Its a wrap(per)
In reality all this plugin is; is a wrapper for the official and excellent Microsoft SDK which uses the Unityplayer.UnitySendMessage method to relay data to the unity application. So thanks and kudos must really go to Microsoft not only for producing a great product, but also for providing great developer support.
With this in mind, hey Microsoft please can I have a free Hololens 🙂 to play with; I promise you wouldn’t regret it 🙂
The official band SDK can be found here.
The plugin can be found via GitHub here.
That all there is to it. I hope that you find the plugin useful and please do send me links to your uses. As a final note, if there is anyone interested in me collaborating with them in a biometric based research project, please get in touch via my facebook page as I am always looking to expand my research network etc.