Ratchets Headlight Prefab
In this post I will introduce some code developed for controlling Ratchets Headlights. The presented script extends the growing C# Mono Ratchet library of scripts for Unity3D and formulates the basis for yet another Unity3D prefab. As with the other scripts that I have featured as of late, the script utilizes both my Simple Serial String Parsing Code and my UnitySerialPort Script to provide serial communication capability between a Unity3D application and Ratchet the robot.
As always the code is both fully commented available for download here and at the end of the post, so without further ado lets have a look at the key features, starting with the Unity3D behaviour:
The Unity3D Behaviour
First up we have the behaviours Start() function. All thats going on here is the initialization of a reference to the serial script for easy access etc. As the UnitySerialPort.Instance value is set in the Awake() function of the UnitySerialPort script, we know that it will be instantiated before the start is called. However I always like to define a null exception check just in case; but in reality this is not really needed.
void Start ()
{
    // Instantiate a reference to the serial script for
    // easy access for communication etc.

    if (UnitySerialPort.Instance != null)
        unitySerialPort = UnitySerialPort.Instance;
}
Code 1: The Unity Behaviour start function
Next we have an example of one of the input polls used to determine the state of the headlights and change its status on the robot accordingly (Code 2). All that is going on here is that we check to see if there is a key or button-press that corresponds to the respective identifier (LightLeft), and if there is toggle the logged status of the LED (LeftLightOn). Finally a string is created that is dependent upon the lights state and is sent to the serialport. This code is situated within the behavious Update() function and thus is called once on each frame.
// Poll for a button input to toggle the status of the
// left light.

if (Input.GetButtonDown("LightLeft"))
{
    // Toggle the status of the light

    LeftLightOn = !LeftLightOn;

    // create a string dependent upon
    // the status of the light

    string L = "L," + (LeftLightOn ? 1 : 0).ToString();

    // send the command to the serialport

    unitySerialPort.SerialPort.WriteLine(L);
}
Code 2: The Left light input poll
The code for the right light is an exact duplicate of the above, except with the properties swapped over to reflect the right side instance e.g. LeftLightOn becomes RightLightOn. The following code block (Code 3) shows the full behaviour. As stated the code is also available for download and can be obtained from here.
<pre class="brush: csharp; collapse: true; light: false; title: ; toolbar: true; notranslate" title="">

//
// Copyright (c) 2010, 2014 All Right Reserved, http://www.dyadica.co.uk

// This source is subject to the dyadica.co.uk Permissive License.
// Please see the /permissive-license file for more information.
// All other rights reserved.

// THIS CODE AND INFORMATION ARE PROVIDED "AS IS" WITHOUT WARRANTY OF ANY
// KIND, EITHER EXPRESSED OR IMPLIED, INCLUDING BUT NOT LIMITED TO THE
// IMPLIED WARRANTIES OF MERCHANTABILITY AND/OR FITNESS FOR A
// PARTICULAR PURPOSE.
//
//

// SJB
// SJB@dyadica.co.uk
// 02.03.2014
//
A MonoBehaviour type class containing several functions which can be utilised
// to perform control if Ratchets headlights via serial communication within Unity3D
using UnityEngine;
using System.Collections;

public class HeadlightScript : MonoBehaviour
{
    // A static reference so that this script can be
    // referenced by others

    public static HeadlightScript Instance;

    // A reference used for quick access to the
    // UnitySerialPort script.

    private UnitySerialPort unitySerialPort;

    // The current state of both headlights

    bool LeftLightOn = false;
    bool RightLightOn = false;

    void Awake()
    {
        // Instantiate the static reference to this script
        Instance = this;
    }

	void Start ()
    {
        // Instantiate a refernce to the serial script for
        // easy access for communication etc.

        if (UnitySerialPort.Instance != null)
            unitySerialPort = UnitySerialPort.Instance;
	}

	void Update ()
    {

        // If the serialport has not been created then return

        if (unitySerialPort.SerialPort == null || unitySerialPort.SerialPort.IsOpen == false)
            return;

        // Poll for a button input to toggle the status of the
        // left light.

        if (Input.GetButtonDown("LightLeft"))
        {
            // Toggle the status of the light

            LeftLightOn = !LeftLightOn;

            // create a string dependant upon
            // the status of the light

            string L = "L," + (LeftLightOn ? 1 : 0).ToString();

            // send the command to the serialport

            unitySerialPort.SerialPort.WriteLine(L);
        }

        // Poll for a button input to toggle the status of the
        // right light.

        if (Input.GetButtonDown("LightRight"))
        {
            // Toggle the status of the light

            RightLightOn = !RightLightOn;

            // create a string dependant upon
            // the status of the light

            string R = "R," + (RightLightOn ? 1 : 0).ToString();

            // send the command to the serialport

            unitySerialPort.SerialPort.WriteLine(R);
        }

        // Poll for a button input to toggle the status of the
        // both the headlights.

        if (Input.GetButtonDown("ToggleLights"))
        {
            // Toggle the status of the lights

            RightLightOn = !RightLightOn;
            LeftLightOn = !LeftLightOn;

            // create each string dependant upon
            // the status of the corresponding light

            string R = (RightLightOn ? 1 : 0).ToString();
            string L = (LeftLightOn ? 1 : 0).ToString();

            // send the command to the serialport

            unitySerialPort.SerialPort.WriteLine("L," + L + "," + R);
        }
	}
}
Code 3: The full Unity3D Behaviour
Also please note that this code can also be utilized in a non Unity3D environment, it will just need a little modification to cater for the method applied for input capture, this is in turn dependent on the usage scenario e.g. XNA, WinForm etc.
The Arduino Script
The Arduino script simply consists of an initialization function, used for setting up the required pins and three additional functions used to toggle the status of the lights. Two of these functions are simply used to toggle either the left or right light. Code block 4 shows the function used to toggle the left light.
// This is a simple function used to toggle the state
// of the left light depending upon the received value
void TurnOnOffLeftLight(boolean onL)
{
  switch(onL)
  {
    case true: digitalWrite(ledL, HIGH);break;
    case false: digitalWrite(ledL, LOW);break;
  }
}
Code 4: The TurnOnOffLeftLight() function
Whilst code block 5 shows the function used to toggle both lights. In each instance a conversion is made from a char value received via serial utilizing (boolean)atoi(char). This code first converts the char to an int and then casts the int as a boolean value. The only real difference is, is that conversion takes place within the function for toggling both lights (code 5), whilst for a single light toggle conversion is conducted as part of the function call (see code 6).
// This is a function used to toggle both of the
// headlights.
void TurnOnOffBothLights(char *prop, char *prod)
{
  // The left light is set via the prop value
  boolean onL = (boolean)atoi(prop);
  // The right light is set via the prod value
  boolean onR = (boolean)atoi(prod);

  // Call the funtion to turn on/off the left light
  TurnOnOffLeftLight(onL);
  // Call the funtion to turn on/off the right light
  TurnOnOffRightLight(onR);
}
Code 5: The TurnOnOffBothLights() function
To make use of the functions all you need to do is expand the case statements within the ParseSerialData() method (as found within my Simple Serial String Parsing tutorial). First up we have the relevant calls for singular headlight operation. The func identifiers for each headlight are “L” and “R” for left and right respectively and the prop identifiers are “0” or “1” for on or off.
// If the data has two values then..
if(count == 2)
{
  // Define value 1 as a function identifier
  char *func = inParse[0];
  // Define value 2 as a property value
  char *prop = inParse[1];

  // Call the relevant identified function
  switch(*func)
  {
    case 'A': FunctionA(prop); break;
    case 'B': FunctionB(prop); break;
    case 'L': TurnOnOffLeftLight((boolean)atoi(prop)); break;
    case 'R': TurnOnOffRightLight((boolean)atoi(prop)); break;
  }
}
Code 6: Extending the ParseSerialData() for single light control
Next we have the relevant call for dual headlight operation. As before the func identifier for the headlight is “L” and the prop and prod identifiers are “0” or “1” for on or off.
// If the data has three values then..
if(count == 3)
{
  // Define value 1 as a function identifier
  char *func = inParse[0];
  // Define value 2 as a property value
  char *prop = inParse[1];
  // Define value 3 as a period
  char *prod = inParse[2];

  // Call the relevant identified function
  switch(*func)
  {
    case 'A': FunctionA1(prop, prod); break;

    case 'J': CalculateTankJoyDrive(prop, prod); break;
    case 'R': ApplyTankDriveRawValue(prop, prod); break;
    case 'V': ApplyTankDriveMapValue(prop, prod); break;
    case 'L': TurnOnOffBothLights(prop, prod);
  }
}
Code 7: Extending the ParseSerialData() for dual light control
In respect to code that’s all there is too it! The following code block (8) shows the complete headlights script with the initialization of the pins and toggle functions.
<pre class="brush: csharp; collapse: true; light: false; title: ; toolbar: true; notranslate" title="">

// Define the pins for each of the LED's

int ledR = A0; // Analog pin 0
int ledL = A1; // Analog pin 1

// Define a startup function for initialization
// of the headlights. This is called via the
// Arduino setup() function.
void headlightSetup()
{
  // initialize the pins as outputs.
  pinMode(ledL, OUTPUT);
  pinMode(ledR, OUTPUT);
  // turn the LED's on or off (HIGH is the voltage level)
  digitalWrite(ledL, LOW); // digitalWrite(ledL, HIGH);
  digitalWrite(ledL, LOW); // digitalWrite(ledR, HIGH);
}

// This is a function used to toggle both of the
// headlights.
void TurnOnOffBothLights(char *prop, char *prod)
{
  // The left light is set via the prop value
  boolean onL = (boolean)atoi(prop);
  // The right light is set via the prod value
  boolean onR = (boolean)atoi(prod);

  // Call the funtion to turn on/off the left light
  TurnOnOffLeftLight(onL);
  // Call the funtion to turn on/off the right light
  TurnOnOffRightLight(onR);
}

// This is a simple function used to toggle the state
// of the left light depending upon the received value
void TurnOnOffLeftLight(boolean onL)
{
  switch(onL)
  {
    case true: digitalWrite(ledL, HIGH);break;
    case false: digitalWrite(ledL, LOW);break;
  }
}

// This is a simple function used to toggle the state
// of the left right depending upon the received value
void TurnOnOffRightLight(boolean onR)
{
  switch(onR)
  {
    case true: digitalWrite(ledR, HIGH);break;
    case false: digitalWrite(ledR, LOW);break;
  }
}
Code N: The full Arduino headlights script
Just as a reminder, the serialDataParse() function can be located within the Main script tab and is reflective of my Simple Serial String Parsing Code. The code in the download should run out of the box as so to speak, however as with the other prefab elements there may be one or two gotchas.
A Look at the Unity Prefab
As with all of the other Ratchet scripts I have packaged the code up as a Unity Prefab. You will be able to see the gameObject with the script attached within your scene window as a headlight symbol gizmo (see featured image). To use the prefab in your own scene all you need to do is drag and drop it onto the stage.
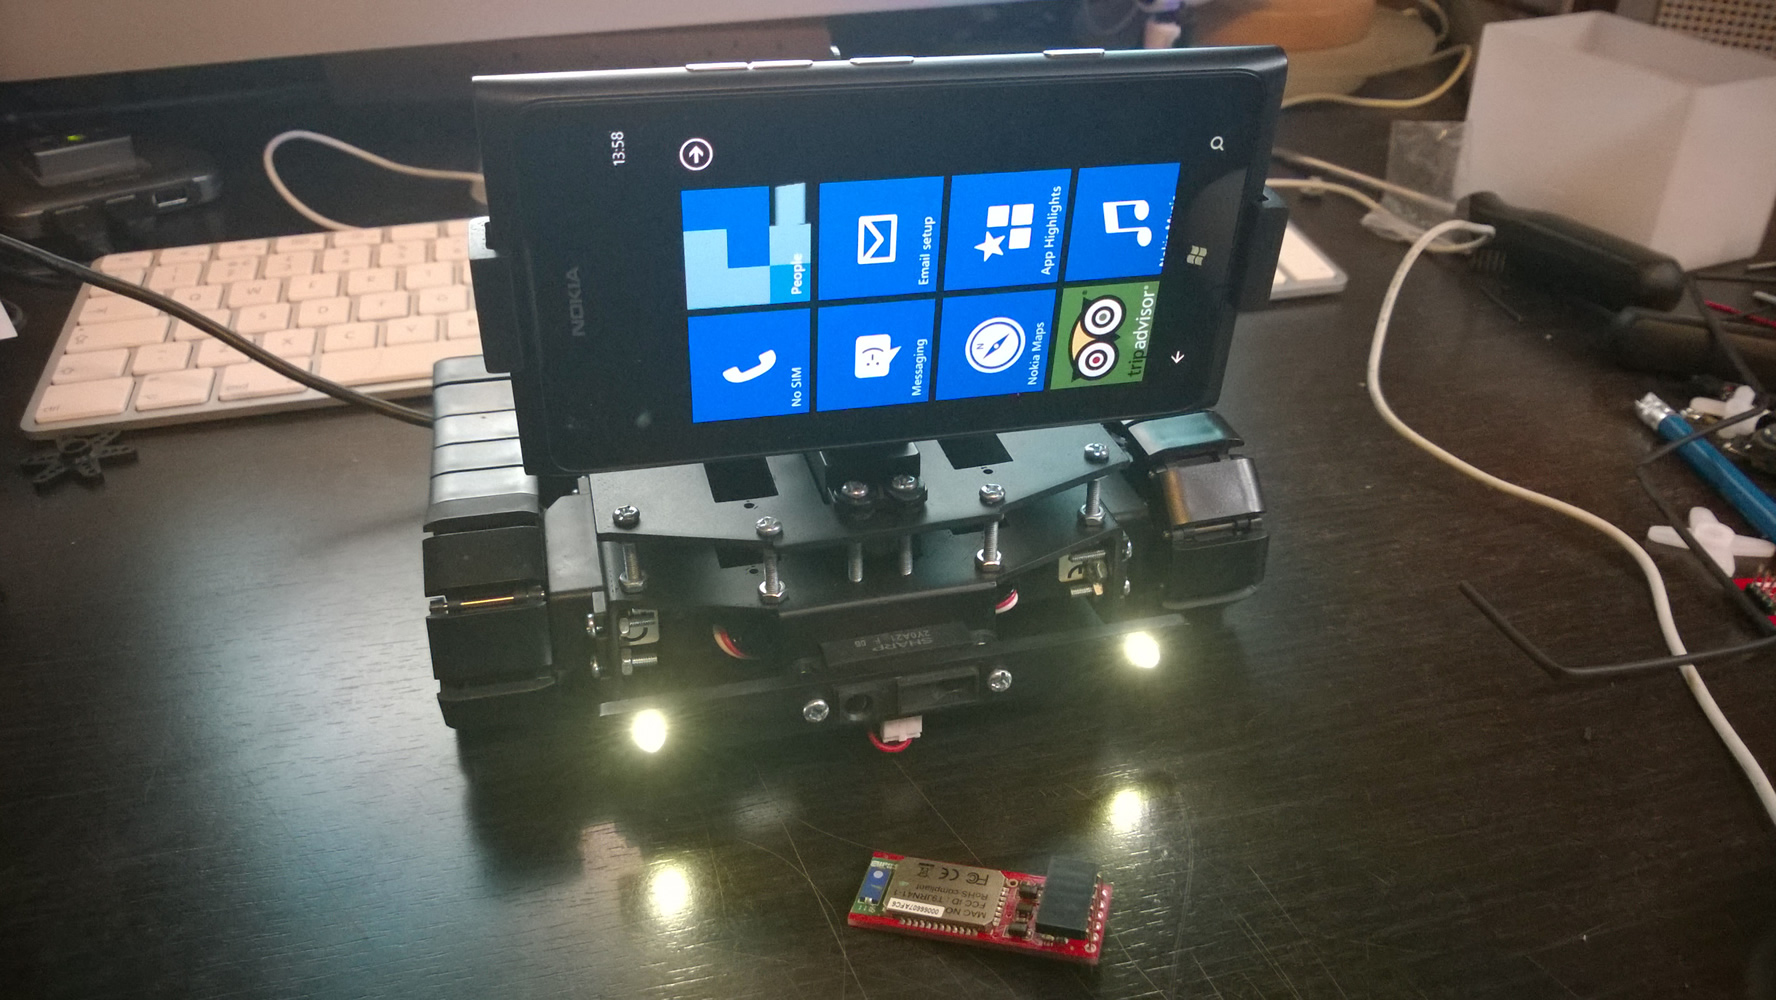
Figure 1: Ratchet with working headlights
As a final note, over time I will probably merge the prefabs and have the script also attached to the TankDrive prefab to make one super Ratchet Robot prefab, but for now will continue to keep things separate as I build.