Setting up a Bluetooth Mate
Here we have a quick tip type post detailing how to configure a spartkfun Bluetooth Mate for micro-controller based serial communication. To this end I will detail how to change both the Baudrate (bits per second for serial data transmission) and the name of such a modem.
Once you understand the basic method needed for communicating with these devices, you will be able individually customise them to match the bespoke needs of your project; including features such as setting the devices password and enabling and disabling authentication.
Connecting to the Bluetooth Modem
In order to connect to either your Bluetooth Mate you will need a RS-232 pass-through communication cable which is able to send ASCII characters via use of a terminal program (the Arduino IDE wont work for this). If you don’t have one of these you can always configure the device via its Bluetooth connection. Personally, I use a Sparkfun FTDI Basic Breakout to power the hardware and then connect via Bluetooth using Digi’s X-CTU as my terminal program. For ref, X-CTU is also the same program that I use to configure my XBee’s (for which it was developed).
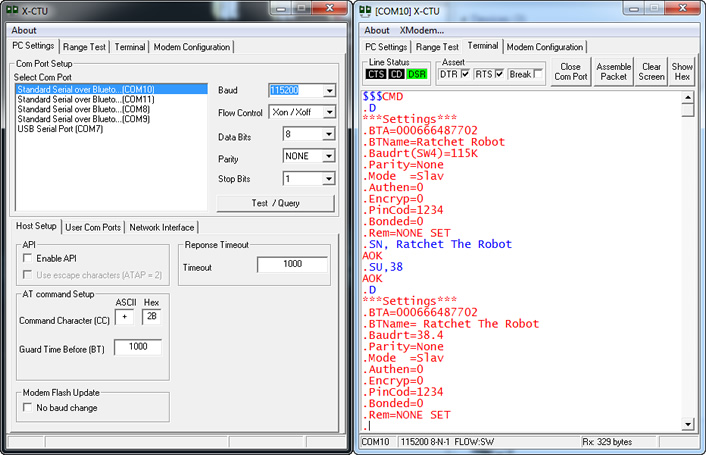
Figure 1: Using X-CTU to set the device name
Please be aware that in order to be able to program the device via Bluetooth you must first pair it with your computer. This is done via the standard add devices method using a pass-code of either 0,0,0,0 or 1,2,3,4.
Once pairing is complete you can then continue with the programming process.
Connection Settings
By default Roving Networks Bluetooth modems such as the BlueSmirf and Bluetooth Mate have the following default configuration:
- A Baud rate of 115200 – Bit rates commonly supported include 75, 110, 300, 1200, 2400, 4800, 9600, 19200, 38400, 57600 and 115200 bit/s
- 8 bits – The number of data bits in each character. 8 data bits are almost universally used in newer applications.
- No Parity – the method of detecting errors in transmission.
- 1 stop bit – Stop bits are sent at the end of every character allow the receiving signal hardware to detect the end of a character and to resynchronise with the character stream.
- Flow Control – Xon / Xoff
All that is needed to program your Bluetooth modem, is to run your terminal software of choice, and apply the (your and or the current) required settings. For the device I am programming (fig 1) I am: connecting to the Bluetooth Mate via COM10, powering the device via COM7 (see featured image). All other settings are that of a standard unmodified device (ok, I have already changed the name once).
Entering Command Mode
To enter command mode you need to send to the device “$$$” (fig 1). If you are successful you should see “CMD” returned. All valid commands sent to the modem will return an “AOK”, response, and all invalid ones will return “ERR“. Commands that are not recognized will return a “?”.
Changing the devices name
Once we are in command mode, all that we need to do to change the devices name is send to the modem the following command (code 1):
//  <value> is the name of the device, 20 characters maximum.
SN, <value>
// e.g. for my robot Ratchet
SN, Ratchet The Robot
Code 1: The update / set name command
Before I did this, I also sent a “D” to the device in order to get a listing of the devices current basic settings as shown in figure 1. This is only so I can demonstrate the name change.
Changing the Baudrate
Similarly, all we need to do to change the Baudrate is to send the following command (code 2):
// <rate is the desired Baudrate
SU, <rate>
// e.g. for my robot Ratchet
// also note, only the first 2 characters are needed
SU, 38
Code 2: The update / set baudrate command
Finally once you are done, all you need to do is exit command mode. This is achieved by sending “—” to the modem.
That’s it for this tip! A full list of commands and more information in regards to programming the Bluetooth Mate and BlueSmirf modems can be found via the datasheet provided by Sparkfun here.