Updating the Unity_SerialPort Script
I recently made a few updates to the old Unity_SerialPort project I initially put together in 2014. The updates include: compatibility with Unity 2021, reintroduction of the previously removed threading based update loop, inclusion of additional port configuration and finally some minor changes to the arduino code so that it also complies and runs on an ESP32.
This post is a TLDR look at the project and how it’s components can be used in your own projects. As always the source-code is available here.
The Example Unity Project
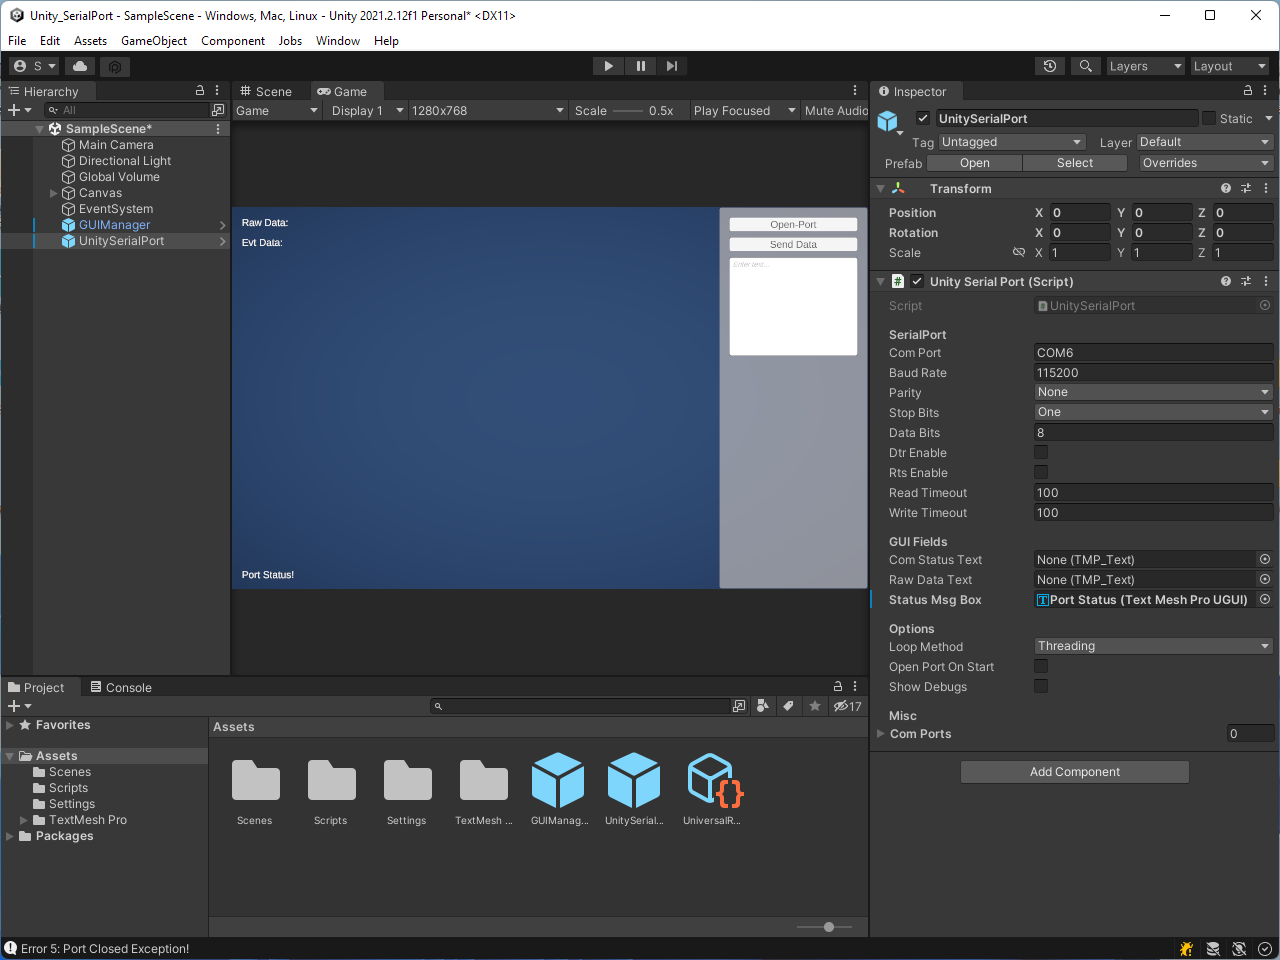 Figure 1: The Opened Unity Project
The unity project demonstrates the use of serial communication between a Unity application and a micro-controller such as an Arduino. Communication is achieved via use of a configurable com port.
Running the Project
Once you have downloaded and opened the project you should be greeted with a project window similar to that shown in Figure 1. If not please ensure that you have opened “SampleScene” and have also selected the “UnitySerialPort” gameObject. The latter can be found within the hierarchy window.
By selecting the gameObject you will be able to see all the configuration properties and options within the inspector window (Figure: 2). The properties can be modified to match the requirements of the port you wish to open.
Figure 2: The Inspector Window
Assuming that you have already deployed the accompanying Arduino script to a compatible micro-controller; modify the COM port property to match that of your attached micro-controller.
You can then hit play! :)
Click the Com Button (Open-Port) to initialise the connection and open the port. A successful connection to the micro-controller will be indicated by the message: “The serialport: COM(N) is now open!” appearing in the Port Status field (bottom left). If you wish for the open port call to be attempted upon application start; rather than by having to click the button. This can be achieved via toggling the “Open Port On Start” option within the inspector.
A Few Example Calls
The following are a few sample calls that demonstrate the operation/functionality of the UnitySerialPort. In order to trigger the examples via key-press, you must first ensure that the custom inputs are defined via:
Edit > Project Settings > Input.
For reference, I have mapped “Key1” to keyboard key 7, “Key2” to keyboard key 8 and “Key3” to keyboard key 9. The command “SendData” is also mapped to the SPACE keyboard key.
Code 1, shows the code used to trigger the commands. It can be located within the Update() method of GUIManager.cs. An equivalent code block can also be found within the Update() method of UnitySerialPort.cs.
The later is commented out and has solely been included to demonstrate that calls can also be made from that location.
if (Input.GetButtonDown("SendData"))
{ unitySerialPort.SendSerialDataAsLine(OutputString.text); }

// Example of sending key 1 press event to arduino.
// The "A,1" string will call functionA and pass a
// char value of 1
if (Input.GetButtonDown("Key1"))
{ unitySerialPort.SendSerialDataAsLine("A,1"); }

// Example of sending key 1 press event to arduino.
// The "A,2" string will call functionA and pass a
// char value of 2
if (Input.GetButtonDown("Key2"))
{ unitySerialPort.SendSerialDataAsLine("B,1"); }

// Example of sending space press event to arduino
if (Input.GetButtonDown("Key3"))
{ unitySerialPort.SendSerialDataAsLine(""); }
Code 1: Example Event Initialization
The highlighted commands can also be sent via use of the example GUI. To do this just enter a command (e.g. “B,1”) into the “InputField” and then click the “Snd Button” (Send Data). This results in a call to the method GUIManager.SendSerialDataAsLine(data). In this instance the data argument will equate to “B,1”. This method in-turn calls the SendSerialDataAsLine(data) command within UnitySerialPort.cs and the data is sent.
Visual indication of the send is provided by an updated message withing Port Status field, bottom left.
Incoming data is visible via both the “Raw Data” and “Evt Data” fields. The former shows the raw string received by the port. The later, the same data parsed into chunks and stored in an array separated via the “Separator” property. In this example it is a “,” character.
More information on the Arduino side of things can be found via both the original unity3d-serialport-script post and also my simple-serial-string-parsing post.
Using the SerialPortScript in Your Own Projects
The SerialPort Script has been implemented so that all incoming data is made available to other scripts via the registration of five events. The sending of data is handled via the use of static public methods. This means that you do not need to modify UnitySerialPort.cs to be able to use it.
To use the script drop the prefab (or even the script onto a gameobject) into your scene. You then need to create an accompanying script both receive the event notifications; and to send data via calls. The included GUIManager.cs is an example of such a script. It is important to note that input data can be obtained solely via the registration of just the “SerialDataParseEvent”.
The following list details all of the events which can be registered to:
- SerialPortOpenEvent
- SerialPortCloseEvent
- SerialPortSentDataEvent
- SerialPortSentLineDataEvent
- SerialDataParseEvent
The other events have been included in order to further aid you in developing front end applications and GUI’s more easily and efficiently. The included GUIManager.cs script demonstrates this capability. In addition to the events UnitySerialPort.cs also contains several methods which are publicly accessible:
- OpenSerialPort()
- CloseSerialPort()
- PopulateComPorts()
- UpdateComPort()
- SendSerialData()
- SendSerialDataAsLine()
These are pretty self explanatory but the following section details their use in conjunction with the aforementioned events. For further clarification take a look at the GUIManager.cs scripts and follow each call.
How to register to an event
Code: 2 shows an example of the code required to register to an event for notifications. In this case it is for the “SerialDataParseEvent” event.
void Start()
{
    UnitySerialPort.SerialDataParseEvent +=
        UnitySerialPort_SerialDataParseEvent;
}

private void UnitySerialPort_SerialDataParseEvent(string[] data, string rawData)
{

}
Code 2: Example Event Initialization
In this example UnitySerialPort_SerialDataParseEvent is the method which will be called each time the event is triggered.
if (SerialDataParseEvent != null)
    SerialDataParseEvent -= UnitySerialPort_SerialDataParseEvent;
Code 3: Example Event Destruction :)
You will also need to perform some cleanup when you destroy the object the event is registered to. this can easily be achieved via placing the following code (3) within the scripts OnDestroy() method.
SerialPortOpenEvent & SerialPortCloseEvent
The “SerialPortOpenEvent” event is triggered each time that a serialport is opened via the use of the UnitySerialPort.cs OpenSerialPort() method. In the case of the example project this call is made either by clicking on the GUI’s “Com Button” button when it is in the “Open-Port” state. Once opened, the “Com Button” is then toggled to the “Close-Port” state. It can then be clicked again to close the port.
Closure of the port will call the UnitySerialPort.cs CloseSerialPort() method. This in turn fires the “SerialPortCloseEvent”. Each event can be used by scripts to indicate when the port has been opened or closed respectively. The code used to toggle the button can be found via the GUIManager.OpenClosePort() method.
In addition to the aforementioned button call(s); the UnitySerialPort.cs OpenSerialPort() method can also be automatically called via the UnitySerialPort.cs Start() method. This is achieved by setting the “OpenPortOnStart” property to true. This should only be used when you have finalised your settings for the port; and dependant upon user-case.
The SerialDataParseEvent
The “SerialDataParseEvent” event is triggered each time that data is read by the UnitySerialPort.cs GenericSerialLoop() method. Once the data has been read, the loop performs some rudimentary parsing by splitting the data into chunks; each defined via the user defined “Separator” property. If a separator is not found within the string of raw data then it is left as a single chunk.
The data is then stored into two public properties (RawData and ChunkData) which can be accessed cross thread[1] via other scripts. In addition the data is also made available as the arguments of the SerialDataParseEvent. The event is fired following the property assignment.
SerialPortSentDataEvent
The “SerialPortSentDataEvent” event is triggered each time that data is sent via the UnitySerialPort.cs “SendSerialData” method. This method sends data exactly as provided with no line ending via the SerialPort.Write(data) method
SerialPortSentLineDataEvent
The “SerialPortSentLineDataEvent” event is triggered each time that data is sent via the UnitySerialPort.cs “SendSerialDataAsLine” method. This method sends data exactly as provided with the addition of line ending via the SerialPort.WriteLine(data) method.
Reading Data
I have also recently added the ability for data to either be read in by line; that is separated by a new line character. Or as a chunk separated by a custom delimiter which can be set by the user via the inspector. The reads utilise the SerialPort.ReadLine() and SerialPort.ReadTo() methods of the SerialPort class.
switch (ReadDataMethod)
{
    case ReadMethod.ReadLine:
        rData = SerialPort.ReadLine();
        break;
    case ReadMethod.ReadToChar:
        rData = SerialPort.ReadTo(Delimiter);
        break;
}
Code 4: Data Read Methods
This means that data can now also be sent as a continuous stream which can be parsed into chunks of your own design; rather than solely as many individual lines. Ultimately it gives a little bit more flexibility for your own differing use case scenarios.
Example Data Output
Finally lets have a look at how we can use an event call to output/use the data. Code 5 shows how we can set the value of GUI Text from within the update method.
if (RawDataGUI != null)
    RawDataGUI.text = "Raw: " + unitySerialPort.RawData;
Code 5: Show Data Via a GUI Text
In this instance RawDataGUI is a text field and unitySerialPort is a reference to the UnitySerialPort.cs class
The first thing to be aware of is that if we are using the threading method we need to use the event data to set the value of a local variable so that be accessed across threads. If you were to use it directly then you would cause an exception; this is because the unity API is only available from the main thread.
UnitySerialPort.cs and GUIManager.cs both contain commented examples to further demonstrate this. Have a go with uncommenting and commenting the example calls and you will see what is and isn’t possible.
// Create the array

ParsedEvtData = new int[data.Length];

// Create a string for GUI display

string values = string.Empty;

// Populate both the array and string using the event data

for(int i=0; i<data.Length; i++)
{
    // Convert the data to ints. These can be viewed
    // via the unity editor!

    ParsedEvtData[i] = int.Parse(data[i]);

    // add to the string
    values += i + ": " + data[i];

    // check if we are at the last value and if not add a new line
    if (i != data.Length - 1)
        values += "\n";

}

// Update the variable so the gui can call it up the update method
EvtDataString = values; // e.g.2
Code 6: Convert Data to Int Array
Finally code 6 shows an example on how to use the UnitySerialPort_SerialDataParseEvent event data by converting it to an array of ints which can then be applied. It also outputs each value to the GUI on a separate line so that they can be easily viewed. Again the display call is made within the Update() method of GUIManager.cs.
The Data Read Loop
In order to change method used to run read loop, all you need to do is select either threading or coroutine via the inspector panel. This can be found under options. Selecting threading will result in a port that reads in data on a separate thread; whilst selecting coroutine utilises the same thread spreading the task across several frames.
public enum LoopMethods
{ Threading, Coroutine }
Code 8: The Loop Methods
Due to the nature of coroutines being frame dependant; in some instances you may have a noticeable lag depending upon your application.
Port Configuration
The new port configuration options are applied either within the OpenSerialPort() method as part of the ports Initialisation; or just before the SerialPort.Open() command is called (see Code: 7).
// Initialise the serial port
SerialPort = new SerialPort(ComPort, BaudRate, Parity, DataBits, StopBits);

SerialPort.ReadTimeout = ReadTimeout;
SerialPort.WriteTimeout = WriteTimeout;

SerialPort.DtrEnable = DtrEnable;
SerialPort.RtsEnable = RtsEnable;

// Open the serial port
SerialPort.Open();
Code 7: OpenSerialPort() - Port Configuration
All of the properties are made available to be modified via the inspector. In theory you should generally only need to change the ComPort name and BaudRate values to get up and running. However the other options are now also available for completeness and to cater for those outlier use cases.
The Thread Loop
In both instances the data read is performed via a call to the GenericSerialLoop() method. The only difference is the loop method used to call it. For more information on the GenericSerialLoop() please see the Reading Data section.
Compatibility with Unity 2021
The last time I updated this project was way back in 2016. At that time the update was a recompile and a GUI update to make it compatible with then new GUI system. There have really been no changes to the original code since 2014 when I added events and removed the capability to loop serial reads via a separate thread. However, since 2016 unity has changed massively and the knock on result was need for the project to once again be upgraded. I hope you like the changes and find it/them useful! If you have any questions or feedback please get in touch via social media or through github issues (whilst im working on applying utterances to the blog!)
P.s. Well done for reading this far!
Just in case the related posts don’t pick them up; here are a few links to my previous posts on the topic that you may find useful:
Future plans for this project include implementing a job system approach in addition to the current Threading and Coroutine methods for running the read loop. However time will tell… hopefully it wont be another 8 years :)